
Learn how VMware vSphere utilizes Data Processing Units (DPUs) to accelerate data processing, enhance infrastructure performance, strengthen security, and simplify lifecycle management. This blog post explores the features of vSphere Distributed Services Engine (DPU) and it’s capabilities.
vSphere Distributed Services Engine, formerly Project Monterey, leverages the capabilities of Data Processing Units (DPUs) capabilities to accelerate data processing, enhance infrastructure performance, strengthen infrastructure security, and simplify DPU lifecycle management.
The Data Processing Unit (DPU) is a hardware component installed on the ESXi hosts, similar to a PCIe device such as a NIC or GPU. Currently, networking, storage, and host management services are executed within the ESXi instance, which virtualizes the x86 compute layer.
In vSphere 8, an additional instance of ESXi is installed directly on the Data Processing Unit. This allows ESXi services to be offloaded to the DPU for increased performance.
vSphere 8 supports greenfield installations and provides support for network offloading with NSX. The vSphere Distributed Services Engine is managed throughout its lifecycle using vSphere Lifecycle Manager. When remediating a host that has a DPU ESXi installation, the DPU ESXi version is always remediated along with the parent host and kept in version lock-step.
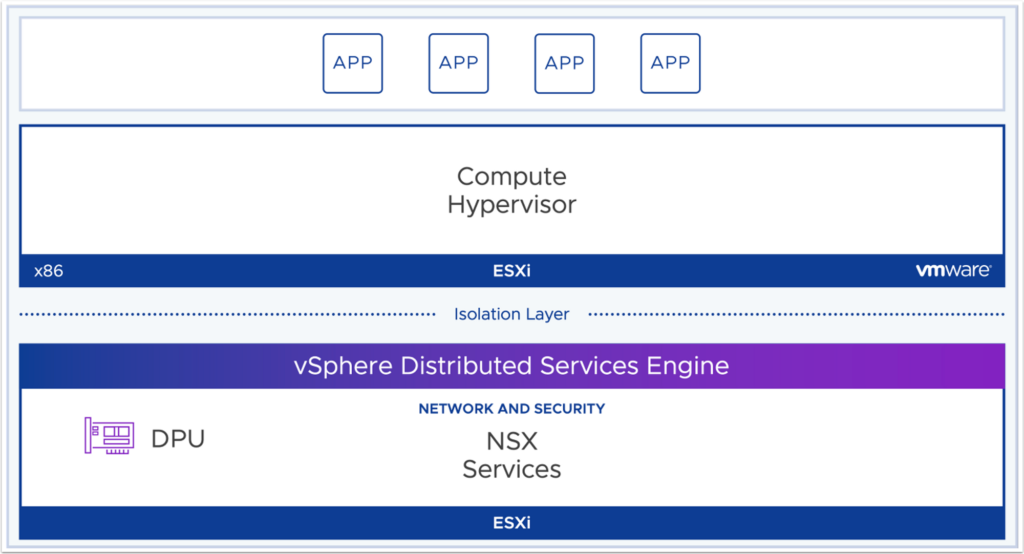
By utilizing vSphere Distributed Switch v8 and NSX, network services are delegated to the DPU, resulting in improved network performance without any x86 CPU overhead. This approach also provides enhanced visibility into network traffic and delivers the expected NSX-level security, isolation, and protection.

Install ESXi 8 on NVIDIA DPUs
Let’s learn how to install ESXi v8 on x86 servers and DPUs, also known as smartNICs. Installing ESXi on both the x86 server and the data processing unit (DPU) is really easy.
When installing ESXi 8 on a server with DPU hardware, you need to select the specific DPU on which you want to install it. As the next step, you also need to select the x86 storage device where you want to install ESXi 8. All the other configurations are exactly the same as a regular ESXi installation, except for this one small change mentioned above.
To begin, connect the virtual media to the physical server. This process is the same as what has been followed for any ESXi version thus far. Select the ISO file of ESXi version 8, and open it. Then, map the device. Once this step is complete, the virtual media screen can be closed.
Next, the server will need to be configured to boot from the virtual CD, DVD, or ISO. Simply select the appropriate option and power on the system. Once the system is powered on, ESXi will be loaded from the virtual DVD or ISO.

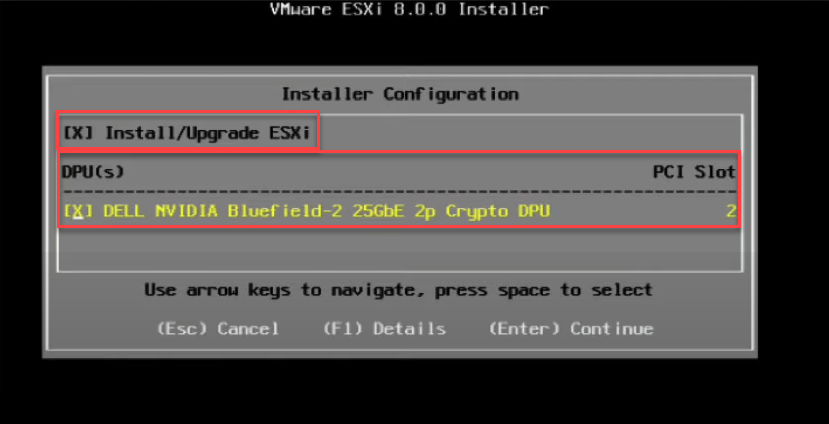
Press “ENTER” to continue on the Welcome screen for ESXi 8 installer.

The next screen displays the differences compared to a standard ESXi installation.
The installer will detect the presence of a data processing unit (DPU) (as shown in the screenshot below, you can see NVIDIA Bluefield 2 DPU) and provide you with the option to select it for installing ESXi on the DPU as well.
But first, you need to select the option “Install ESXi” or “Install/Upgrade ESXi” if you already have an existing ESXi installation on the server. After that, select the DPU and press Enter to continue.
This process instructs the server to install ESXi on both the x86 server storage and the DPU simultaneously. A single ISO image is used to install on both locations, ensuring that they have the same version and build number.
From this point on, the process remains the same. Select the disk on which to install or upgrade ESXi, and choose to install ESXi, overwriting any existing data.


Next, select the keyboard layout and enter the root password for the x86 ESXi. Once the password is entered and confirmed, ESXi is installed on both the x86 server storage and the DPU.

You can see the below screenshot, the installer says that ESXi will be configured to both x86 server storage as well as the NVIDIA DPU.

When the installation is completed successfully, remove the installation media and reboot the server.

Enable Offloading-Compatibilities on vDS (vSphere Distributed Switches)
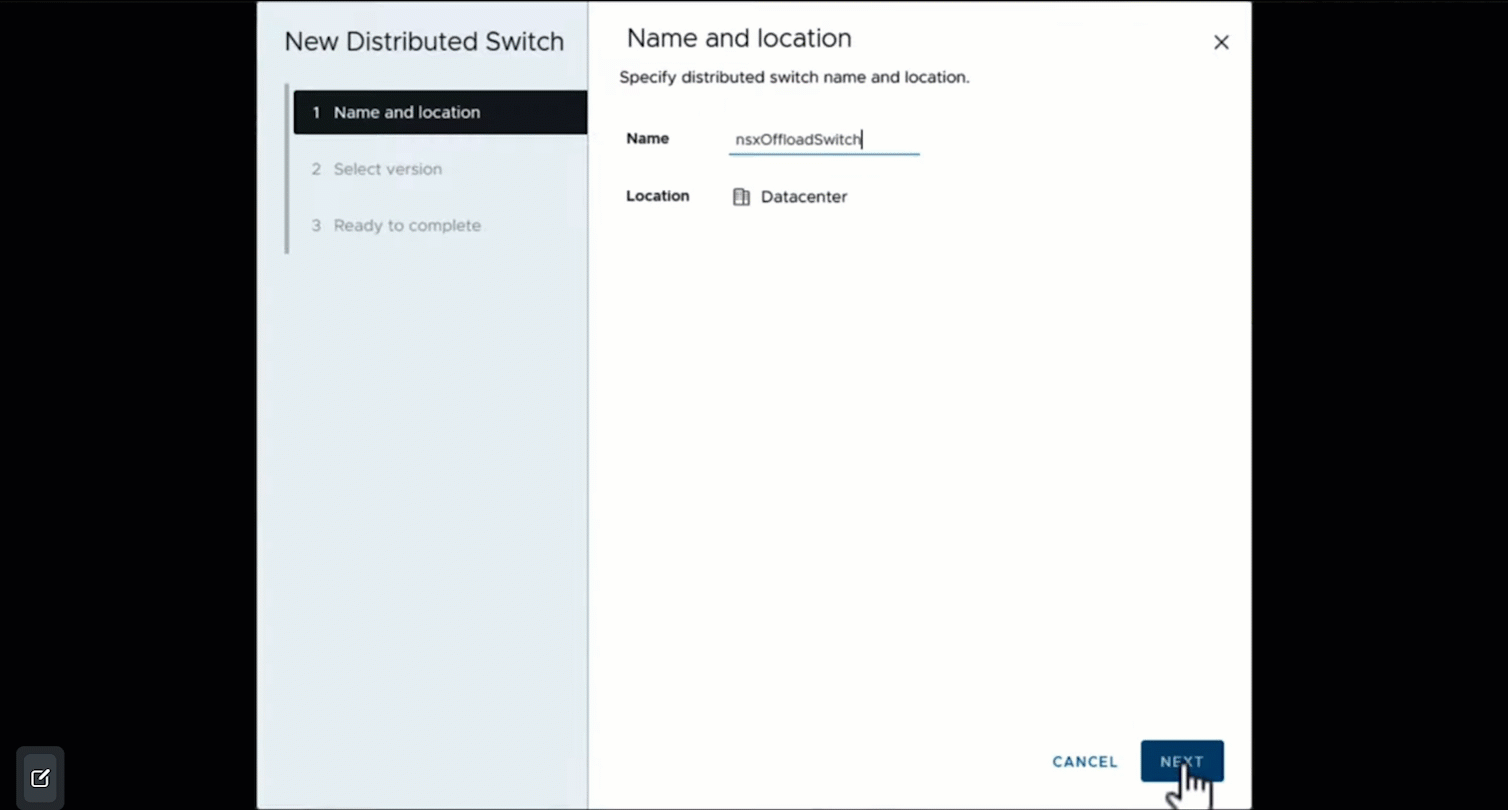
If you have ESXi hosts with DPU hardware and the ESXi operating system is installed on the DPU hardware, you can enable offloading compatibilities on a vDS. This can be done during the creation of a new vSphere Distributed Switch.

In the Select Version screen, choose a distributed switch version. I will select version 8.0.0 and click NEXT.
In the Configure settings screen, specify the Network Offloads Compatibility. I will select NVIDIA BlueField, which is our DPU.
The remaining process of creating a Distributed Switch and adding hosts to the distributed switch remains the same.
However, on the Add and Manage Hosts screen, under COMPATIBLE hosts, only the hosts with the required DPU hardware will be displayed.
Configure VMs for UPTv2 support
When using vSphere Distributed Services Engine, you have the option to utilize UPTv2 and/or MUX mode to improve performance and reduce network hops and CPU resources on X86 servers.
UPTv2 enables passthrough to the VMs by leveraging VMXNET3 drivers instead of relying on vendor-specific drivers.
Importantly, UPTv2 still provides access to vSphere features like HA and DRS, unlike SR-IOV where these features are not available.
To configure the VMs for UPTv2 support, it is a simple check box. Under the Network Adapter properties, you will see an option to enable ‘Use UPT Support‘ if the Network Adapter(s) of the VM is connected to an NSX-T segment (Overlay/VLAN). You get this option when creating a new virtual machine or editing the properties of an existing virtual machine.

Conclusion
VMware vSphere continues to evolve and innovate, enabling organizations to maximize the performance and security of their infrastructure. With the introduction of DPUs and the vSphere Distributed Services Engine, organizations can offload network services, improve performance, and enhance security without compromising on scalability and flexibility. UPTv2 support further enhances performance and reduces resource consumption, making VMware vSphere the go-to virtualization platform for modern data centers. Stay ahead of the curve and leverage the power of VMware vSphere to optimize your infrastructure today.

